Wednesday, February 26, 2014

Activating Wasatch Willy Sourdough Starter - Easy and Simple

(Scroll to the bottom to order your own Wasatch Willy Sourdough Starter.)

Sourdough Starter is not like your fast acting yeast you purchase at a grocery store which is why I like it so much. It's an all natural product from nature which has been untouched by science. 

The other day I made two batches of bread. One was sourdough using Wasatch Willy and the other was wheat bread made from fast acting yeast. Time from mixing the dough to the oven:

Sourdough Bread - about 15 hours
Fast Acting Yeast Bread - about 4 hours

I send out my starters in small sealed packets which contain a teaspoon of dried sourdough starter. The natural yeasties in the starter shut down and protect themselves as they are exposed to the air and they begin to dry out. When they are re-introduced to water and flour they begin to slowly spring back to life.

It is not unusual for dried sourdough starter to take 3 or more days to fully re-activate.

A customer in Canada recently contacted me because his Wasatch Willy was not activating. It was bubbly and had the smell but was not rising. He used filtered water instead of bottled as I suggest in my instructions. 

Below are pictures of my recent activation from dried granules. Today is Day Three.

Step One:

Place 1/2 cup "Bottled" water that is at room temperature into a quart jar. I used a 40 ounce peanut butter jar. 

Pour the starter granules into the water, stir a little and let them sit for 15 minutes.

Pour 1/2 cup unbleached white flour into the jar and stir again. Cover loosely and let sit for 12 hours. Leave it on your countertop.

Step Two

After 12 hours stir and pour out half the starter and discard. Now add 1/2 cup flour and 1/2 cup water and stir. Cover and let sit for another 12 hours.

Step Three

By this time your starter has been percolating slowly for 24 hours. Remove the lid and take a wiff. Ah! So good! Give it a stir. Does the starter feel stringy? It should be stringy at this stage.

Again, add 1/2 cup flour and 1/2 cup bottled water, stir and let sit twelve more hours. Are you bored yet? It is slow and tedious but the rewards are wonderful.

Repeat Step Three until the starter doubles in size.

Now that my Wasatch Willy is growing I can switch to filtered water or tap water. If you do decide to use filtered or tap water split your starter in two. One for bottled water and the other for the water you choose to go with. That way if your "other" water kills your starter all is not lost.


Wasatch Willy Day One Zero Hour
Wasatch Willy Day Two - Third Feeding
Wasatch Willy Sourdough Starter Day Three - after 5th Feeding.
If you have ANY questions you can e*m*a*i*l me at b*i*l*l*k*a*r*o*l*y@gmail.com. Remove the * from the email address.


- - - - - - - - - - - - - - - - - - - - - - - - - - - - - - - - - - - - - - - - - - - - - - - - - - - - - - - - 


To simplify the updating process of my blog entries I have created a single ORDER page you can go to by clicking here. As the blog slowly grows in size (a few posts each month) it becomes an arduous labor updating each and every one of them so hopefully this will make the pages easier to peruse and more enjoyable. Thank you.

Tuesday, February 18, 2014

Making A Better Bread Lame


This is a design which has been stuck in my head for some time now. It is made from two paint sticks. These are from the older, nicer, paint sticks which you cannot get any longer. The larger paint sticks for the large buckets of paint are still decent and will work but they are thicker overall. Walmart sells them here for .28 each and one is enough. Just cut it in half.

You Will Need:
2 paint sticks
3/16" drill bit and a Drill
2 washers
3/16 x 3/4" machine screw
3/16" Wing Nut
Wood Glue
Two clamps
scraps of wood
Miter Saw
Safety Razor Blade

One side of each stick has printing on it so you want to face the printed sides inward. Make a mark about six and a half inches from the end of the stick. From about 3" to 7" apply a very very thin coat of wood glue and clamp the sides together. Be sure and use the scrap wood to protect your Lame from marks caused by the clamps. Wipe away excess glue. Make sure your sticks are straight and even. Allow the glue to set and dry. Usually about 24 hours.


When the glue is dry, remove the clamps. Using the miter saw, cut your lame down to 6 or 6.5 inches.


On the non-glued section of the Lame decide where you will drill the hole for the machine screw. For me it was 13/16's inch from the end and and 1/2" from the edge. I put a scrap piece of wood under the Lame to minimize damage caused by the drill bit. 


Sand the Lame and finish it as desired. For mine I used a clear acrylic spray.


Sourdough or French Bread Lame Construction, glued at one end.
Bread Lame Glued


Sourdough or French Bread Lame Blade Installed
Bread Lame with Blade Installed

Sourdough or French Bread Lame Blade ready to slice the dough,
Bread Lame with Blade Ready to Slice

Sourdough or French Bread Lame Blade ready to slice the dough.
Bread Lame with Blade Ready to Slice

Sourdough or French Bread Lame Blade Stowed for safety.
Bread Lame with Blade Stowed for Safety


Sourdough or French Bread Lame Blade Stowed for safety.
Bread Lame Finished and Blade Stowed
Sourdough or French Bread Lame Blade Scored Dough

Sourdough or French Bread Lame Blade Scored Baked Bread
Samsung Galaxy Note 3 Free Wallpaper
FREE 1920 x 1280 Wallpaper for Cell Phone
- - - - - - - - - - - - - - - - - - - - - - - - - - - - - - - - - - - - - - - - - - - - - - - - - - - - - - - - 

To simplify the updating process of my blog entries I have created a single ORDER page you can go to by clicking here. As the blog slowly grows in size (a few posts each month) it becomes an arduous labor updating each and every one of them so hopefully this will make the pages easier to peruse and more enjoyable. Thank you.

Friday, February 14, 2014

Making a Bread Lame - Redoux


There is a link at the bottom of the page for more info regarding my seven different starters and how to order them. I offer a Super 7 bundle pack at a nice discount and also a single order starter pack that includes any two starters of your choosing. You can also click here for more info as well.


When making French Bread or Sourdough Bread you need to score the tops of the loaves before placing them in the oven. This allows the bread to expand and  not tear apart. A Lame is used to score the bread. Finding a Lame locally can be a bit tricky and you could order one from Amazon or make one for yourself.

What You Will Need:

For the Lame itself:
1 piece 1/4x20 Bolt or Screw
2 Pieces Washers
1 Piece Wing Nut
A stick - Piece of Paint Stick or Yard Stick
Safety Razor Blade or Scraper Razor Blades*

Tools Needed
A Drill
A 1/4 inch Drill Bit


Before drilling the hole in the wood, determine the position of the Screw.

I used a paint stick from a Big Box store made for a gallon or smaller paint cans. The larger sticks may be better.

Assembly
Drill the hole and then insert one washer onto the screw and push the screw through the hole. On the other side place the other washer and the wing nut. Slip the blade between the wood and the washer and angle it as needed for use. When not using, simply loosen the wing nut and reposition the razer blade.

Here are some pictures of my semi-finished Lame.


Lame - Blade in Position

Lame - Wing Nut Back Side


Lame - Blade in Storage Position

Bread Scored with Lame before baking.

Bread Scored with Lame after Baking.

* Some thoughts on razor blades. A while back I bought some blades at Walmart and when I decided to redo this project I went back and could not find any double edged razor blades. I ended up going to Target and Walgreens but found them at my local Kroger (Smith's).

At Walmart I picked up some single edge blades in the paint department which also work but the Double Edged blades are thinner and sharper.


- - - - - - - - - - - - - - - - - - - - - - - - - - - - - -


To simplify the updating process of my blog entries I have created a single ORDER page you can go to by clicking here. As the blog slowly grows in size (a few posts each month) it becomes an arduous labor updating each and every one of them so hopefully this will make the pages easier to peruse and more enjoyable. Thank you.


Wednesday, February 12, 2014

A DIY Easy to Make Baking Stone - Part Two

aka DIY Pizza Stone

UPDATE 4/5/2014
One of the pieces or Travertine has cracked! But I have others. I have thought about heating the stones in stages. Not sure if this will help or not. The cracking is caused by my boiling water which I pour into a cast iron pan which sits directly below the stones.

I have this big bump on the back of my head from a slip on the ice in my works dimly lit parking lot on Monday night and it kept me up all night. I ended up with about two hours of sleep so if I am rambling and making no sense, please forgive me.

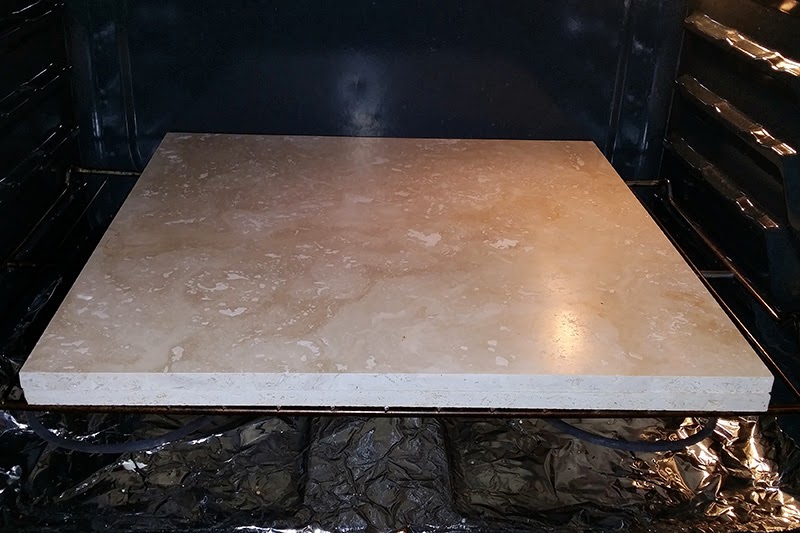
In Part One we discussed the options of Baking Stones such as ceramic tile, actual baking stones, and Travertine. I showed a picture of the stones I purchased at my local Big Box Store. I spent about $17 for two 18x18 Tuscany Travertine square tiles and they were snug from front to back on the rack. I almost thought I would not be able to close the oven door but it was no problem.

Since I was restless (my head hurting like a son of a gun) I thought about the dimensions of the oven rack and at 3AM I got up and measured. I determined the ultimate size would be 11" x 14" for my oven and after only a few hours sleep, I went to my BBS (BIG BOX STORE) with the tiles from yesterday and bought two more. I then had a fine gentleman cut them down for my on their tile saw. The cuts were free, by the way.


Free Cuts at Lowes - Travertine as Baking Stone
I had intended to double up the stones but they just weigh too much. 24 pounds of tile is just too much for our ovens rack to handle. So now I have an extra set and a side effect of cutting the tiles I now have 3 pcs of 7x14 inch Travertine as well so I effectively have three sets of baking stones.

Tomorrow night we are having 15 Bean Soup with bacon and Turkey Sausage served in bread bowls. Tonight I made six. The first three were baked on sheets on the Travertine and the second set of three were baked directly on the stones.


Sourdough Soup Bowls baking at 425 F

Sourdough Soup Bowls Cooling
 - - - - - - - - - - - - - - - - - - - - - - - - - - - - 


To simplify the updating process of my blog entries I have created a single ORDER page you can go to by clicking here. As the blog slowly grows in size (a few posts each month) it becomes an arduous labor updating each and every one of them so hopefully this will make the pages easier to peruse and more enjoyable. Thank you.


A DIY Easy to Make Baking Stone - Part One

or: The Search for the Alternative to High Priced Baking Stones

I have searched and searched for a Baking Stone (Pizza Stone) for use when making my sourdough breads and the costs were just unreal in my opinion. Comments on Amazon were filled with story after story of how the Baking Stones either arrived broken or they broke in the oven on the first use. So I went looking for a solution.

Kiln Shelves
Kiln Shelves are half round stones and cost about $60 each, uncut. You then have to cut them to shape. Not a perfect solution. If you look locally at a Ceramics Supply store you can find these but there has to be a better way.

Ceramic Tiles
I have tried these in my oven previously and they have to be unglazed but they crack eventually.

Travertine Tiles
The other day I loaded up You Tube on my Galaxy Note 3 and there was a video by Noreen of Noreen's Kitchen espousing the virtues of Travertine. This really caught my attention and I did a little more research and watched another video from someone else and decided to go for it. 

Our local Lowes sells A&R Tuscan Travertine 18 inch square tiles that are just under half an inch thick and they sell for $7.76 each here in Northern Utah. Prices may vary elsewhere. I bought two. After taxes it was about $8.26 each. Stacked together they are about 7/8" thick and they are kind of too big for the depth of our even. I am going to go back and get another one and bring the two I bought with me to have them cut down a little so they fit the oven. The optimal size for my oven is 22 x 14 inches. I figure on making them 11 x 14 inches. 

Here is a photo of the uncut stones on the bottom rack of the oven.


In Part Two I discuss baking bread directly on the Travertine using my Wasatch Willy Artisan Sourdough Bread made with my Wasatch Willy Organic Sourdough All Natural Yeast (aka Sourdough Starter).

 - - - - 


So as to simplify the updating process of my blog entries I have created a single ORDER page you can go to by clicking here. As the blog slowly grows in size (a few posts each month) it becomes an arduous labor updating each and every one of them so hopefully this will make the pages easier to peruse and more enjoyable. Thank you.