Showing posts with label pizza crust. Show all posts

Monday, January 26, 2015

Barb Geiger Makes A no-KNEAD Bread

How to order one of my starters - CLICK Here

Customer Barb Geiger commented:

Hi!

My first loaf was horrible – I added gluten to make up for the whole wheat and my dough was too wet to handle. It tasted fine and it had a lot of holes, but the crumb was more of an epoxy than anything else. I was trying to make no knead sourdough but my traditional no knead recipe needed some modifications. My second loaf was crackly and perfect, but I gave it away. But my third loaf was absolutely perfect and completely no knead and I didn’t have to share it with anyone. The tang was there in the back of the mouth and the crust and crumb were perfect. It’s even 30% wholewheat and you’d never know it for the taste and the softness and the crust is the best part of all.

I’ve made my own starter before, but nothing with this sourness. Thank you so much! I’ve been using the discard to make sourdough waffles on a silicone waffle pan nearly every morning which have been amazing, but I have three more pounds of sourdough bread dough in the fridge that just need to be formed into loafs and baked off. This is amazing, thank you!


I asked her to share her method and recipe.

Absolutely! It’s not mine, I found the technique on the net, but I had to make some adjustments. It seems complicated, but there’s a lot of hurry up and wait in this. Total work time is about 10-15 minutes and this dough lasts in a container in the fridge (with a hole in it) for up to two weeks, and the longer it sits, the better it is. It’s a variation of the Jim Leahy version of no knead bread and the artisan bread in 5 minutes technique by making more than just a pound at a time. I’ve used the 1-2-3 sourdough by Flo Makanai to use a sourdough starter instead of the ¼ tsp yeast per pound or so of flour. My addition is not shaping the dough at all. Using the frying pan and parchment paper technique was taken from artisanbreadbystev from youtube. I’ve only stood on the shoulders of giants and combined all their methods. Lots of steps but very little actual work. Maybe 15 minutes or so of you having to do something for the overnight process. Flour does its own thing, and the longer you let it sit, the yummier it gets. Everything in the supermarket uses chemicals to replace time, and that time is going to pass whether you have bread dough on the mantle or not.

It’s based on the 1-2-3 method, so:
one part of sourdough starter
2 parts dechlorinated water (I used a pitcher of water that’s been sitting on the counter for 3-4 hours and if I run out of that, bottled water)
3 parts flour (This was 50 ounces of white, 10 ounces of whole wheat)
Then the flavor additives:
1 loaf uses about a pound of flour, so for every pound of flour I try to use
1 ½ tsp of salt
2 tbs of honey
(If you’re using whole wheat, you can throw in a tsp of gluten. Totally optional)

Step 1: test your starter. If it produces enough CO2 to float in a cup of water, you’re good to go. If it can’t, add add 1/8th tsp yeast, jik per pound of flou. Early starters may need it, advanced starters will not.

Step 2: Feed your starter. I read somewhere the thicker your starter, the more sour the dough. I like feeding it 2 parts flour to 1 part water. This is an add some to some recipe. Wait 3-4 hours until it’s really bubbly and ready to go. The thicker the starter, the more sour it’s going to taste. Weigh your starter. This is your official part.

Step 3: Add twice the weight of your starter in declorinated water and your salt, sugar and yeast (but only if you have to. This recipe relies on trust in the process)

Step 4: Add three times the weight of your starter in whatever kind of flour you need. Most of it should be white bread flour. Try keeping it 80% white, 20% whatever, but add a tsp of gluten if you have it. If you don’t, don’t worry, your bread flour has lots of protein in it to carry the whatevers to bread perfection

Step 5: Mix in your flour. You’re going to have two different reactions to the mix: Oops! This is going to be soup, then 30 seconds later you’re going to think it’s going to be way too dry. If you have a Danish wire whisk, use it. We’ve been using an oatmeal spurtle. Back of wooden spoons work, too. Depending on how wet your starter is, you might need to add another ½- ¾ of a cup of water, but don’t worry if it’s terribly shaggy. That’s good. If it’s too runny, you’re going to get an epoxy hockey puck at the end result. The flour should be mixed up and you could probably add that last bit of water just to get the dry flour off the bottom, but don’t worry. This will work.

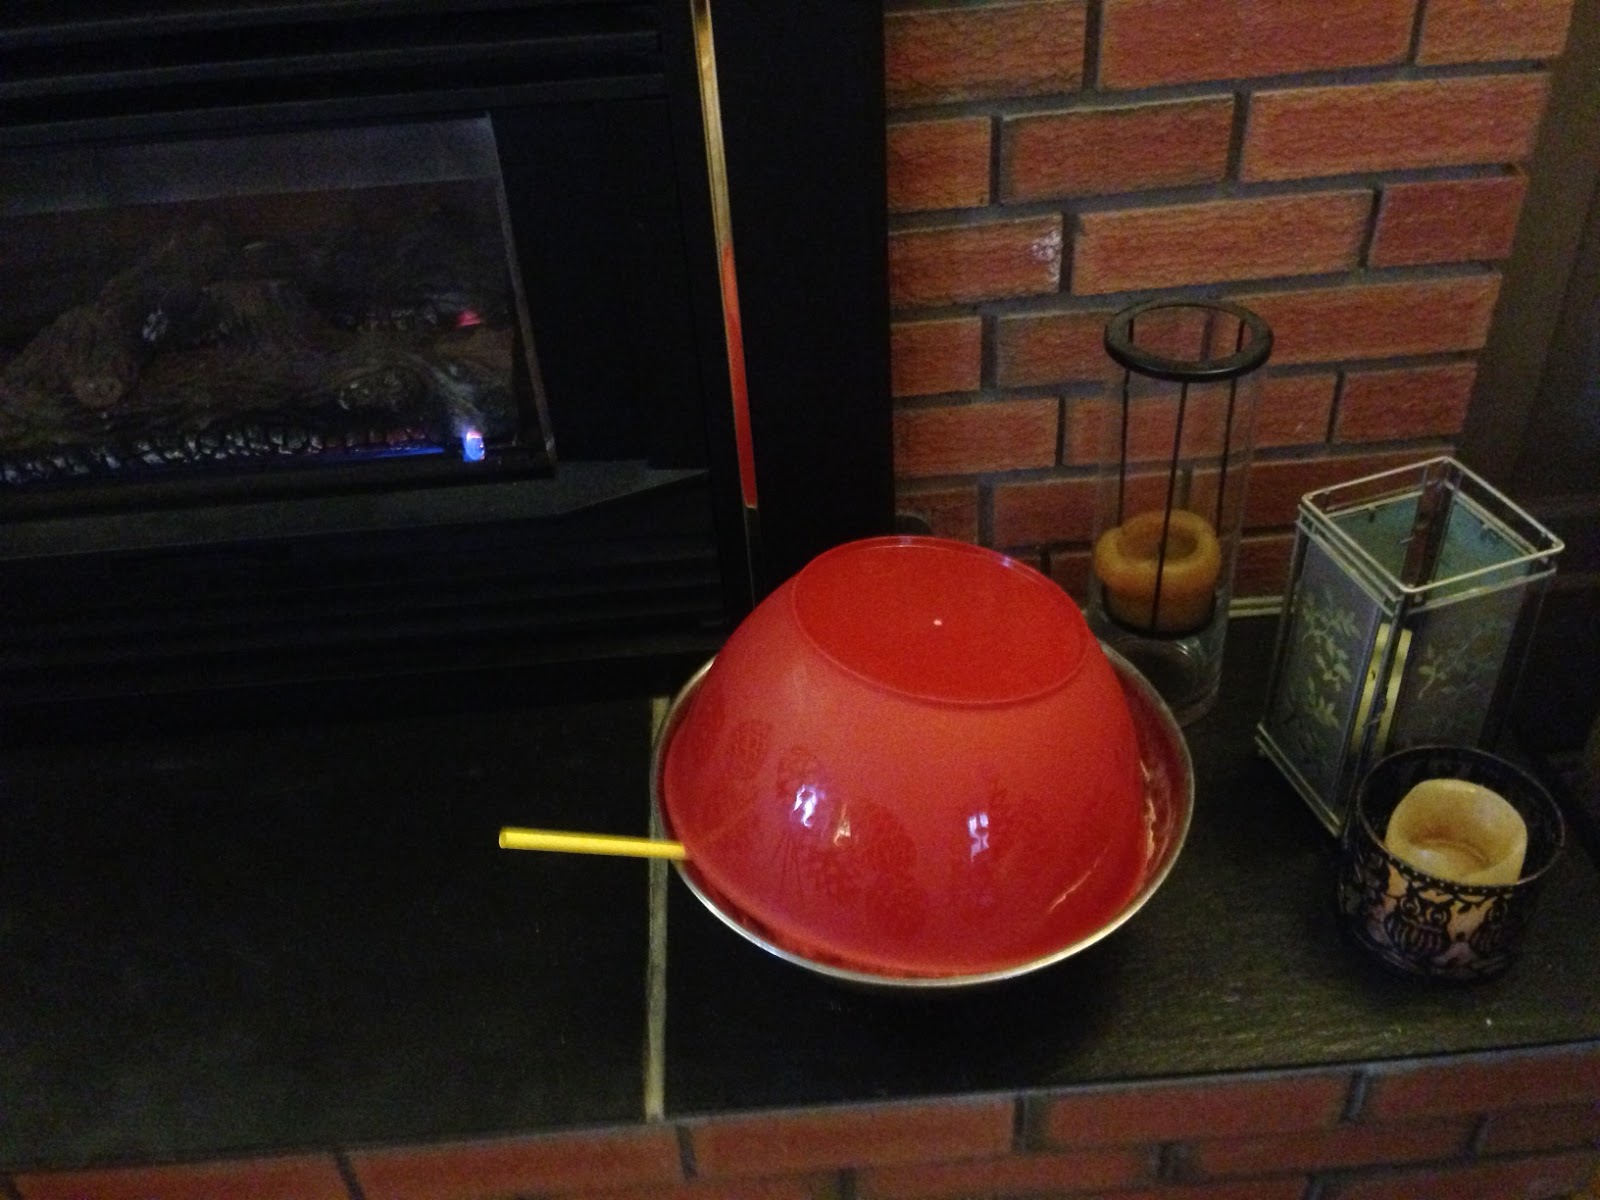
Other than feeding the starter, steps 2-5 should take less than five minutes. Cover your beast, name it something kindly, and put it somewhere warm. We keep ours on the mantle in a big bowl with a plate on top of it and a straw to make sure Herman can breathe. See attached bread dalek photo. I’ve since switched to a Tupperware with a whole in it.

Let it sit in the warm spot for 12 hours or overnight. I live in Canada and I have unheated an unheated boot room, so when it’s cold in the winter time, I put Herman outside in his Tupperware container once he’s been sitting out. You can leave him at room temperature for 18-24 hours, but that worries me. Sourdough is specifically meant to be kept at room temperature for ever, but any time you’re dealing with an agricultural ingredient, food safety should be #1.

Step 6: Take out a bread size lump. A lot of people suggest folding or rolling or pinching to make him be a better bread shaped thing, but I degas him in the Tupperware, put the piece of parchment paper down on a non-stick frying pan, and stretch him out as far as he can go and the dump him in the 10” skillet. I dust him with more flour, cover him with another parchment paper, and wait 3 hours with the bread dough, now named Herman Jr. on the mantle. If he’s not been chilled at all, you only need an hour proof or so. To the point where you poke him and he doesn’t get huffy and push that dough right back out at you.

Step 7: After Herman Jr. Has been waiting three hours and has formed a nice dry crust around him, I heat up my enamel cast iron pot. I’ve tried a 3 quart that fits him perfectly and a 5 quart which seems too big, and he does way better in the too big pot. Heat the oven and the pot for 30 full minutes @ 500 degrees. I keep a pizza stone in the oven to keep the oven hot.

Step 8: When the oven’s ready, slash Herman open with something (I uses scissors…usually, in the photo he’s un slashed. Slashing the loaf gives oven spring more of a chance, but he turned out perfect as was). Then open the door, gather up the edges of the parchment paper Herman Jr’s been resting on, drop him in the cast iron pot gently, cover and bake for 30 minutes. I’ve kept the oven @ 500 and at 450 and it doesn’t seem to make a difference.

Step 8: After 30 minutes, remove the lid and the parchment paper from under Herman, turn oven down to 350 degrees, and bake 10-20 minutes. 10 minutes if he’s a smaller loaf, 15 if he’s bigger, 20 if he’s huge. The darker he is, the better he crust. If it goes a very dark brown, don’t worry, he’ll taste amazing. At home chefs don’t let things brown as much as professional kitchens do, and brown is where the flavour is)

Step 9: THE MOST IMPORTANT STEP. Wait for Herman to cool ALL THE WAY DOWN before slicing. I know hot buttered bread is engrained in our DNA, but the starch in Herman is still in a gel-like state. Popcorn starch goes from a gel to a sold in milliseconds. Bread starch takes longer. If you absolutely need to have that fresh from the oven scorching hot melted butter experience, make buns instead so you’re only sacrificing one to the gummy-gods, not your whole effort.

I know this seems like a lot of steps, but most of it is hurry up and wait. Feed your starter, wait, add water, honey, salt, and mixing in the flour is about five minutes of work, and that’s the hardest part. The bread should be cooked by the pound. The cooking seems complicated, but you get the hang of it. Take about a pound of your dough, let it rise a second time in a warm place. Preheat oven + pot with a lid, slash bread, put bread in pot, wait 30 minutes, uncover and take paper away, bake 10-15 minutes, rest it. It’s about 10 minutes total time, you can do it on a Saturday/Sunday then have bread dough in the fridge for the next two weeks.

It’s amazing what you can do when the dough’s just waiting for you to use it. You’ll never order pizza again when you can have the most amazing sourdough crust on your table in under an hour, 40 minutes of which is allowing the stretched dough to rise and 10 minutes of that is cooking. Real Italian pizza is just bread dough and cheese, and when you taste this, you’ll understand why it doesn’t need anything else. This is simple enough to let the kids shape the dough after school and have it ready for you to cook when you get home. Teenagers can put the pot and the lid in the oven and turn it on to high, but I really suggest the adult be the one to actually gather up the parchment paper and put hot things in hot places.

How to order one of my starters - CLICK Here

Friday, November 14, 2014

Three New Starters and New Buying Options

Three New Starters!
I have added three new starters:

Sierra Gold - From California Wine Country
Quinn Hartley's Kern County Sourdough Starter
Chef Don's Megaheart Sourdough Starter


New Purchasing Options!
I have also added new purchasing options. You can now buy just one, any two, any four or all ten starters.

11-17-2014
There was a problem with the four pack ordering for Canadian customers not working but it is now fixed.

Order Here

Recent Loaves Using Quinn Hartley's

Thursday, October 23, 2014

Three New Sourdough Starters

I now have three new sourdough starters. All are from California. They are:

Sierra Gold 
Made from wine grapes from a vineyard southeast of Sacramento, California in the the Sierra Foothills. Has a Mild sour taste and gives a lively rise to any sourdough recipe.

Chef Don's Megaheart.com Sourdough Starter
This is from grapes grown near Auburn, California. I would call it a medium sour and it too has a good lively rise action. I recently made pancakes with this starter and they were delicious.

Quinn Hartley's Kern County Sourdough Starter
The south central San Joaquin Valley is home to some of the largest table grape growers in North America. Quinn Hartley's sourdough starter comes from some of these grapes grown up against the Sierra Foothills. It has a nice sour smell and taste and is very active.

These starters have now been added to the Order Page.

Enjoy. 

Sunday, July 27, 2014

How to Order My Wasatch Willy Sourdough Starter

Orders are not live yet. I'm having PayPal order button issues. 

Cost is $10 for my Wasatch Willy Sourdough Starter with instructions and recipes. Please use the buttons below to order. Thank you.

In the meantime you can send $10 per order via PayPal to Bill Karoly / email is billkaroly AT gmailDOTcom

Be sure and email me with your address info.

Thanks

Wasatch Willy's
The Original Great Salt Lake Sourdough Starter

Simply the best sourdough starter I have
ever used. Made it myself from local wild yeasts.
Absolutely delicious. Just sour enough. Tastes very
similar to a good San Francisco Sourdough but it comes
from the Great Salt Lake region of Utah. It is a good and
lively natural Sourdough Yeast.


Wednesday, July 9, 2014

I've Been Feeling A Little Guilty of Late

It's been over a month since my last batch of sourdough bread and quite honestly I have been feeling a little guilty about it. I've been sidelined since falling on some black ice in February and hitting my head pretty hard which is the main reason for my tardiness. It is difficult for me to spend a lot of time at the computer working on my blog too which is frustrating in itself. Thank goodness I have this blog because it is one of the few things that helps me keep my sanity.

Well, today I started a batch of bread using the Best Damn Alaskan Sourdough Starter. It came out of the mixer a little after twelve noon and since I now take a lot of naps I will be baking bread most likely around midnight tight. During the winter I like to let the dough sit for up to 24 hours but since it summer, the basement is about five to ten degrees warmer than normal and the dough will turn to liquid mush if I wait that long. What I really need is a second fridge where I could let it sit. 

My basic bread recipe is one batch of starter, 3 cups water, some salt to taste (varies per persons needs) in this case I use a tablespoon and 9 cups white flour. I used my Bosch Universal Mixer to mix it all together and let it run with the dough hook for about ten minutes.

If you do not have an electric stand mixer I highly recommend a Danish Dough Hand Whisk. Check it out. If you are really strong and industrial you can do it all by hand by starting out in a large bowl until the dough is stiff and then turn it out onto your counter top until you have worked in all nine cups of flour. We used to make our homemade whole wheat bread this when we were younger.

I then place the dough (stiff and not gooey or sticking to the bowl or the center post) into a large bowl I have greased and I take it to the basement to sit for 12-16 hours. I then bring back upstairs, preheating the oven with my Travertine tiles and cast iron pan to 475F for about an hour. Meanwhile I form my loaves and place them on an upside down baking sheet that has been covered in cornmeal. I use my homemade lame to score the loaves as well. I ten cover them with a damp cloth and let rise for a couple hours or until I think they are at their peak. Then I boil some water and place it in the cast iron frying pan that is on my bottom rack then I place the bread in the oven and set the timer for 15 minutes. When the times goes off I reduce the temp to 400F and reset the timer to 30 minutes. When it goes off I may or may not decide to let the bread stay in the oven for a little while longer. I have backed my bread for 60 to 75 minutes to no ill effect other than a darker red crust.

One tool I used to use quite a bit was one of these Digital Meat Thermometers to check the internal temperature of my bread. If you are concerned about whether or not your bread is cooked enough or not then get one. Besides, it has many other handy uses too. 

We haven't been sitting still with the starter though because I have made several batches of pancakes. I hate to wash unused starter down the drain.

Sourdough has several uses and if you ask me it tastes even better when it's a day old and a little tougher. I love the crunchy crisp crust you get when the bread comes fresh from the oven. This is something you only get with steam and is why it is so important to have a pan in the oven when you preheat it.

One thing I have never made from sourdough are biscuits and this is something I intend to work on. 

So if you are wondering what you can do with sourdough here is a short list: Sourdough Pancakes, Sourdough Cinnamon Rolls, Sourdough Hamburger Buns, Sourdough Bread Bowls and a whole lot more. I have done all of these and others in my blog.


My latest results.


Feeding My Starters
Just a brief note about feeding my starters. I used to feed them one for one. That is one cup flour to one cup water. I now feed them one cup flour to about 3/4 cup water at room temperature. Some folks weigh them one for one and that's fine too but for my method works just as well and takes less time. I use a large peanut butter jar because I like it better than a wide mouth Mason Jar. Large Peanut Butter jars are easier to dump the flour into without making a huge mess.

When I dump a batch of starter into my mixer I usually leave enough at the bottom of the jar that fills the slanted portion. It's about half a cup of starter not counting the starter stuck to the sides of the jar. I dump in the flour and the water and stir with a chopstick using the blunt end and scrape all around the jar from top to bottom and then loosely place the lid on the jar and no, the sourdough does not smell or taste like peanut butter. Be sure and clean it with hot soapy water. It is always good to have several of these on hand. That little blue line is where the starter is when fed before it rises nearly to the top of the jar.

Here are some images of the bread I have made.


I love the color and the structure sourdough provides.


Thanksgiving Dinner Rolls


A Whole Wheat Loaf made with Best Damn Alaskan. It was Extremely sour. 


Bread Bowls made with Wasatch Willy's Sourdough Starter


Wasatch Willy's Bread Bowls Baked on Travertine Tiles
- - - - - - - - - - - - - - - - - - - - - - - - - - - - - - - - - - - - - - - - - - - - - - - - - - - - - - - - 


So as to simplify the updating process of my blog entries I have created a single ORDER page you can go to by clicking here. As the blog slowly grows in size (a few posts each month) it becomes an arduous labor updating each and every one of them so hopefully this will make the pages easier to peruse and more enjoyable. Thank you.

Tuesday, June 3, 2014

All Hail The Mighty Kale! Sourdough Style!

There is a link at the bottom of the page for more info regarding my seven different starters and how to order them. I offer a Super 7 bundle pack at a nice discount and also a single order starter pack that includes any two starters of your choosing. You can also click here for more info as well. 

These are easy to make pancakes and they are healthy and good for you too. 

Sometimes when I feed my starter of the moment I dump it down the drain and other times I make pancakes. This morning I thought I would add a banana and then after adding it I and placing it in my nice high speed blender my thoughts wandered to the kale in the garden.

The Kale survived the winter which totally surprised me. So I ventured out in my bare feet and plucked some green and went back to the kitchen where I dropped the greens into the blender until a minute or so later I had a green batter. I also added one large egg. 

Here are the approximate ingredients:
  • Wasatch Willy Sourdough Starter, about 2 cups
  • 1 Large Egg
  • 3 Tablespoons Fat free Sour Cream
  • 1 Banana
  • Kale, 1 Cup, give or take
  • ½ teaspoon Salt (optional)
  • 2 Tablespoons Sugar or Honey
  • ½ teaspoon Baking Soda
  • 2 Tablespoons EVOO (Extra Virgin Olive Oil)
I will admit in the above ingredients I omitted the oil because I simply forgot and it still turned out ok. I was going to add strawberries too but some rascal ate them. 

Cook on a hot cast iron griddle because it is not ok to cook sourdough on a non-stick surface. That would be so crass. It would be like wearing a tuxedo to a rodeo. 

Pictures are at the bottom of the page.

- - - - - - - - - - - - - - - - - - - - - - - - - - - - - - - - - - - - - - - - - - - - - - - - - - - - - - - - -


My Sourdough Starters

In early 2013 I started selling a San Francisco Sourdough Starter, Valentina's, which I obtained while stationed at the Presidio of San Francisco in 1978. Since then I have extended my starters to an old family starter from San Francisco which I have named after my Grandmother whom I affectionately called, Babo. I also created a non-sourdough starter (Tara) for use in normal bread recipes and it works fantastically. I have two Alaskan Starters as well, Alaska Sam's and Best Damn Alaskan Sourdough Starter, both of which are good and sour. 


A friend gave me an old Mormon Pioneer Sourdough Starter which came across the plains in the 1800's which I call, Parley's. 


My favorite starter is named after me, Wasatch Willy. It's made from locally obtained wild yeasts and is a real crowd pleaser. Everyone who has tried it really likes it.


All orders include:

  • A packet(s) of dried starter
  • Activation Instructions
  • Jar Label


Shipping Rates

All Prices include shipping. The US Post Office recently raised rates and so I have had to modify my prices slightly. I ship First Class mail. Single orders are shipped in a #10 envelope. Super 7 Bundles are shipped in a package.

Where Do I ship to:

I ship to anywhere in the United States, Canada, Australia, UK and Europe. If I have a problem shipping to your country I will let you know and refund your order in full if there is a problem. If you live in a country where mail delivery is not reliable please order at your own risk.


- - - - - - - - - - - - - - - - - - - - - - - - - - - - - - - - - - - - - - - - - - - - 


To Order:
So as to simplify the updating process of my blog entries I have created a single ORDER page you can go to by clicking here. As the blog slowly grows in size (a few posts each month) it becomes an arduous labor updating each and every one of them so hopefully this will make the pages easier to peruse and more enjoyable. Thank you. 
 - - - - - - - - - - - - - - - - - - - - - - - - - - - - - -
Kale Banana Sourdough Pancake Images


The Unlucky Dole Banana


The Easy to Make Sourdough Pancake Batter


Kale Growing In My Garden


Sourdough Pancake On A Cast Iron Griddle


The Best Tasting Ever Sourdough Pancake On A Cast Iron Griddle

Wednesday, January 8, 2014

Less Flour Equals a Wetter Dough Equals Better Results

Lately I have been experimenting with making the dough by hand and I have been very please with the results. Here is the recipe:

1 batch starter (Wasatch Willy in this case) (about a cup)
3 Cups water
1 Tablespoon Salt
6 Cups Flour

I use an IKEA cup that holds just over a cup when filled to the lip. 

In a large bowl combine the starter, water and salt. Stir. Feed the starter and continue.


Now add the flour a cup at a time. The flour will be very lumpy and sticky. Be sure and wipe the sides and bottom of the bowl to get all of the flour mixed into the dough.

Cover the bowl and let it sit for 12-16 hours in a cool location. My basement has been around 60-65 degrees F and is perfect for this.

Turn on the oven light and get the oven warmed up to  around 80-90 F.

On a large clean work surface spray water and then dump the dough onto the surface. Keeping your hands wet form the loaf.

Take a baking sheet and lightly spray with oil and sprinkle corn flour or dry creamy wheat cereal. Place the loaf on the baking sheet.


Place the racks in the oven on the bottom two shelves. Place a cast-iron skillet on the bottom rack. Pre-heat the oven to 475 F.


Boil two cups of water and pour into the skillet when the oven is at temperature. Place the baking sheet with the loaf in the oven and set the timer to 45-60 minutes and lower the temperature to 400 F. If the loaf is not too dark go ahead and bake it for the full 60 minutes. 


You can also apply a wash to the dough at the 45 minute mark and bake for another 10 minutes. Prepare the wash before you bake the bread. For the wash boil two cups of water and a heaping tablespoon of cornstarch until it starts to thicken. Then set it aside and cool.

You should get a nice oven bounce. Place the finished loaf on a cooling rack and let it sit for 15 minutes before serving.


- 


To simplify the updating process of my blog entries I have created a single ORDER page you can go to by clicking here. As the blog slowly grows in size (a few posts each month) it becomes an arduous labor updating each and every one of them so hopefully this will make the pages easier to peruse and more enjoyable. Thank you.


Wednesday, December 11, 2013

Merry Christmas from Mister Sourdough

There is a link at the bottom of the page for more info regarding my seven different starters and how to order them. I offer a Super 7 bundle pack at a nice discount and also a single order starter pack that includes any two starters of your choosing. You can also click here for more info as well. 

I have been thinking about what to say for my latest blog entry and seeing as how it is Christmas time once again I want to give thanks to all who have ordered the various starters. Sourdough is fun and I think appropriate for the upcoming Christmas Dinner and what better sourdough starter than our very own Wasatch Willy Sourdough Starter. Order now and your starter will arrive in plenty of time for the Christmas holiday. Canadian orders take about two weeks to arrive and US orders are delivered within a few days. All orders are mailed promptly via First Class mail. It takes about three days to fully activate a starter from dry granules so keep that in mind when you order.

I have recently made several loaves of bread and rolls from Wasatch Willy and I love the flavor it provides. This is my favorite starter and tt's made from wild yeast found in the Greater Salt Lake Valley near Ogden, Utah and I am certain it will become your favorite as well.


Wasatch Willy's Sourdough Starter

When you order Wasatch Willy's Sourdough Starter you will get a packet of starter granules, instructions on how to start it up with three recipes and a jar lid label. When activating always use bottled water* and use a quart canning jar or something similar such as a clean large peanut butter jar. I use a chopstick to stir my starter. When using our starter you do not need to save half when feeding. I typically dump out the entire jar with the sides and bottom covered and then feed by adding a cup of flour and a cup of bottled water*.

* A thought on bottled water. It really depends on your local water supply. If your water is heavily treated then please only use bottled water. When activating your starter for the very first time please use bottled water only which is at room temperature or slightly warmer. After your starter is activated you can experiment with your city water on another jar and see how it reacts. Where I live our city water is ok to use but other cities may vary.


- - - - - - - - - - - - - - - - - - - - - - - - - - - - - - - - - - - - - - - - - - - - - - - - - - - - - - - - 

My Sourdough Starters

In early 2013 I started selling a San Francisco Sourdough Starter, Valentina's, which I obtained while in the US Army stationed at the Presidio of San Francisco in 1978. Since then I have extended my starters to an old family starter from San Francisco which I have named after my Grandmother whom I affectionately called, Babo. I also created a non-sourdough starter (Tara) for use in normal bread recipes and it works fantastically. I have two Alaskan Starters as well, Alaska Sam's and Best Damn Alaskan Sourdough Starter, both of which are good and sour. 

A friend gave me an old Mormon Pioneer Sourdough Starter which came across the plains in the 1800's which I call, Parley's. 

My favorite starter is named after me, Wasatch Willy. It's made from locally obtained wild yeasts and is a real crowd pleaser. Everyone who has tried it really likes it.

All orders include:
  • Two packets of dried starter. The one you order and one other at my discretion. Usually Alaska Sams or the other Alaskan starter. Limit one free starter per customer and does not include the Super 7 bundles.
  • Activation Instructions with recipes
  • Jar Label


Shipping Rates
All Prices include shipping. The US Post Office recently raised rates and so I have had to modify my prices slightly. I ship First Class mail. Orders are shipped in a #10 envelope. 

Where Do I ship to:
I will ship to anywhere in the United States or Canada. 


Questions: Call us at 801-784-8090 Monday - Friday 10am to 4pm Mountain Time.


To Order:
So as to simplify the updating process of my blog entries I have created a single ORDER page you can go to by clicking here. As the blog slowly grows in size (a few posts each month) it becomes an arduous labor updating each and every one of them so hopefully this will make the pages easier to peruse and more enjoyable. Thank you.


Saturday, July 13, 2013

Making a batch of bread

There is a link at the bottom of the page for more info regarding my seven different starters and how to order them. I offer a Super 7 bundle pack at a nice discount and also a single order starter pack that includes any two starters of your choosing. You can also click here for more info as well. 

So I started a batch of bread today and currently it is stewing in a bowl down here in the basement until sometime tomorrow. I used our newest sourdough starter, Best D%#% Alaskan Sourdough Starter, and here is how I prepared it.

First of all, you need to understand that I do not always measure the amount of starter that I use in my normal bread recipe. I adjust the amount of flour in the mixer and sometimes I add an additional amount of water as needed. Usually it is not very much. Maybe a tablespoon or two at the most.

Preparing the starter:

Two days ago I refreshed my starter by dumping out most of it and adding 1 cup of water and 1 cup of flower. 

Yesterday I stirred it up and added half a cup of flour and a little water, stirred it up and let it sit overnight.

Making the Bread:

Today I pulled the mixer out and started a batch of bread. I added 3 cups room temp filtered water, about a cup of the starter and roughly 8 cups bread flour. I added the flour until the dough came clean from the bowl. The dough was just a little dry so I added a little water and ran the mixer for 6 minutes.


Next I prepared a large bowl and lid by spraying oil in the bowl and the underside of the bowl. Then I placed the dough into the bowl and brought it downstairs into the basement where it is the coolest to sit overnight.

Tomorrow afternoon I will separate the dough into loaves and bake. My first batch of bread with this starter was good but I made the mistake of covering in plastic and the surface was very interesting to say the least. Tomorrow when I bake it I will not cover it and will instead just score the loaves and let them rise.

If you want to try this, be sure and pre-heat your oven to 450 degrees for 10 minutes and then 375 for about 30 more minutes until golden brown. Place a cast iron frying pan on the bottom rack. I set my racks to the two lowest, frying pan on the lowest. When the bread is ready to go in the hot oven I add the bread and then pour boiling water into the cast iron pan and close the door. Set the timer for 45 minutes. 

-
Order your own Best Damn Alaskan Sourdough Starter today or try one of our other starters. 


My Sourdough Starters

In early 2013 I started selling a San Francisco Sourdough Starter, Valentina's, which I obtained while in the US Army stationed at the Presidio of San Francisco in 1978. Since then I have extended my starters to an old family starter from San Francisco which I have named after my Grandmother whom I affectionately called, Babo. I also created a non-sourdough starter (Tara) for use in normal bread recipes and it works fantastically. I have two Alaskan Starters as well, Alaska Sam's and Best Damn Alaskan Sourdough Starter, both of which are good and sour. 

A friend gave me an old Mormon Pioneer Sourdough Starter which came across the plains in the 1800's which I call, Parley's. 

My favorite starter is named after me, Wasatch Willy. It's made from locally obtained wild yeasts and is a real crowd pleaser. Everyone who has tried it really likes it.

All orders include:
  • Two packets of dried starter. The one you order and one other at my discretion. Usually Alaska Sams or the other Alaskan starter. Limit one free starter per customer and does not include the Super 7 bundles.
  • Activation Instructions with recipes
  • Jar Label


Shipping Rates
All Prices include shipping. The US Post Office recently raised rates and so I have had to modify my prices slightly. I ship First Class mail. Orders are shipped in a #10 envelope. 

Where Do I ship to:
I will ship to anywhere in the United States or Canada. 


Questions: Call us at 801-784-8090 Monday - Friday 10am to 4pm Mountain Time.


To Order:
So as to simplify the updating process of my blog entries I have created a single ORDER page you can go to by clicking here. As the blog slowly grows in size (a few posts each month) it becomes an arduous labor updating each and every one of them so hopefully this will make the pages easier to peruse and more enjoyable. Thank you.


Monday, June 24, 2013

A New Alaskan Starter is Here!

A friend who used to live in Alaska in the 70's came by yesterday and gave me a jar of his starter he picked up there. According to him it was old when it was given to him and there is no way to estimate how old it really is but it is one of the most active starters I have seen in awhile. 

He abuses the heck out of it and it survives year after year. In fact, it sits in his fridge and gets used once or twice a year and only gets fed when he uses it. So what happens is the little voracious sourdough beasties go dormant. To activate, he pulls it out of the fridge and stirs the liquid hooch back in and feeds it. He even uses, get this, tap water! Who'da thought?

I activated some and tried it out with my San Francisco Bread recipe and it was nice and sour. I made the mistake of covering it while letting it rise so the surface looked the moon with pockmarks everywhere.

Praise from a Canadian Customer
"Just FYI, I started the Best Darn Old Alaskan starter on sat or sun and I can hardly contain it :). It is doing very well.
Just wanted to let you know. I will bake with it on Saturday and really looking forward to it!"
James G. Victoria BC Canada


To simplify the updating process of my blog entries I have created a single ORDER page you can go to by clicking here. As the blog slowly grows in size (a few posts each month) it becomes an arduous labor updating each and every one of them so hopefully this will make the pages easier to peruse and more enjoyable. Thank you.