Showing posts with label bread. Show all posts

Wednesday, February 8, 2017

Just Make A Batch of Sourdough Bread!

I am calling this post, Just Make a Batch of Sourdough Bread, because sometimes you need a little encouragement. We all need it sometimes.

I have been running low on some granules of Valentina's and Babo's San Francisco Sourdough Starter. My last post was of a batch of bread using Valentina's because I reactivated her and once ready spread the starter on a large plastic tray to dry and since Valentina's was now active I also made a couple of batches of bread and made pancakes too a few times.

Next I activated a batch of Babo's. In fact, right now I have four loaves baking in the oven and it smells oh so good. 

Valentina's and Babo's both come from San Francisco but they are different. Babo's needs a little more care after making the dough. I let the dough rest for twelve to fourteen hours in a cool environment of about 60-65 degrees F before dividing into loaves. I then let the loaves sit at 80 to 85F for a couple more hours before placing in the oven.

I use the same basic recipe for all of my sourdough starters:

1 Batch of Starter doubled in size 
3 Cups room temp water
1 to 2 Tablespoons Salt*
8 or 9 Cups Unbleached Flour

I combine all the ingredients in my Bosch mixer and let the machine run for ten minutes after the last of the flour is added. Pour 90 percent of the starter into the mixing bowl. You only need a little starter left in the jar when feeding it. I am not of the school that says to only use half. In my opinion that is ridiculous and can lead to weak starters. By using all but some scraps in the jar you are promoting healthy vibrant sourdough starters.

Then I remove the dough and place in a large plastic Tupperware bowl that has been sprayed with cooking oil. Then I place the lid on top but not sealing it and let the dough rise overnight. The next day I divide the dough into 4 or 5 round loaves and place on a tray that has been lightly oiled and sprinkled with a little corn flour. 

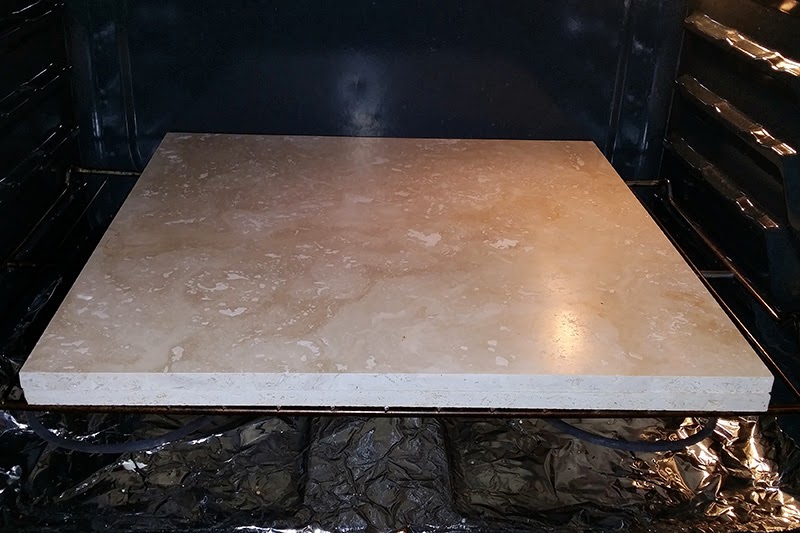
In my oven I have a Travertine tile from Lowes that I pre-heat to 450F. I also have a small cast iron frying pan that I pour in 2 cups of boiling water. Wear large oven mitts for this because you may burn yourself at this stage. Always be careful. 

I either transfer the loaves to the travertine directly or I just lay the tray I am using on top of the stone, add the boiling water and then close the door and reduce the temperature to 400.

Making your own homemade sourdough bread is very rewarding. If you would like to order one or all of my starters you can click here.

* Use of Salt for those on a salt restricted diet. Check out Chef Don's Megaheart.com site for his sourdough recipes.

Pictures of today's batch of bread are coming.


Babo's SF Starter
35 Minutes in the Oven so far


Thursday, January 19, 2017

Restoring A Sourdough Starter From Long Term Refrigeration

Restoring A Sourdough Starter From Long Term Refrigeration

I like to store my sourdough starters in the fridge and I tend to do it long-term without feeding. Whenever I am ready to reactivate a sourdough starter I take it out of the fridge, stir the liquid on top back into the starter and scoop out a small spoonful. I then drop it into a jar and add one cup all purpose white flour and three quarters cup water which is about 70 degrees F. It will feel just barely cool to the touch. Then I stir it all together and loosely cover my jar and then place it in a good location that's not too cold. In this case I chose my mantle above the gas fireplace because it was about 65 degrees. My kitchen is about 50. For this sourdough starter I used tap water. Your use of tap water may get different results.

Look at the photo below. This is my old Valentina's (Wasatch Willy's is similar) after a day and a half! From the fridge it takes roughly 36 hours to become fully active. You can tell the starter is going to be ok because after 12 hours the sourdough starter is stringy. I stir it up and dump it down the drain leaving about a quarter cup still in the jar. I feed it and let it sit for another 12 hours. Then after 12 hours I dump out most and feed it again. Within the next 12 hours it will be very active.

Click here for ordering info.

My Valentina's San Francisco Sourdough Starter.

Monday, March 16, 2015

Fresh Sourdough Today from Wasatch Willy's Great Salt Lake Sourdough Starter

I made a fresh batch of sourdough bread today using my exclusive Wasatch Willy's Great Salt Lake Sourdough Starter.

Normally I make boules but the last two times I made bread I have been too lazy so instead I used my nice long Norpro pans my daughter bought me. Came out fantastic.


I have mentioned the recipe several times before in this blog but I'll repeat it for those who would rather just see it now and not have to search for it.

Ingredients:

1 batch fresh Starter (at least 8 hours after feeding)
3 cups water
8-10 Cups Unbleached White Flour. DO NOT USE BREAD FLOUR.
1 Tablespoon salt

When I say one batch I mean dump it all into your mixer bowl. Do not scrape the jar. After dumping most of it out go ahead and feed it. You do not have to save half like most Traditionalists will tell you.

Mix the starter, water and salt together until blended. Start adding flour one cup at a time. Until AFTER the dough comes away from the bowl. Knead for ten minutes.

Place the dough in a greased large plastic bowl and lightly cover and let it sit for twelve to sixteen hours in a cool place. I like to use our basement because it is always cool enough down there all year long. You can place it in the fridge but be prepared to let it sit for at least 24 hours or more until the dough hits the top of the bowl. I use one of those large Tupperware bowls. We have the older and the newer Tupperware bowls. The older bowl is wider and not as deep and the dough always hits the lid. The newer large bowl is deeper and the dough never hits the lid.

When the dough is ready to divide into loaves I like to turn on the oven at 350 for a minute and turn on the light. This prepares the oven for the loaves to sit and rise until ready to bake.

I usually divide the dough in thirds. On my scale that's about 850 grams per loaf. Divide the dough and place in loaf pans. Cover with a damp cloth and let rise in a warm place for a couple hours.

If you used the oven to let your bread rise take it out and move your oven racks to the bottom two slots and heat your oven to 450 F. Place a small pan on the bottom rack. You are going to pour two cups boiling water into this pan after the oven is heated up and after you put the bread in the oven,

Be sure and use a Lame to score the tops of your bread before placing them in the oven. This is really easy if you make boules. If you use bread pans like I did it's more of a challenge unless you use more dough per pan.

Boil two cups of water.

Place your bread in the hot oven.

Wearing oven mittens, pour the boiling water into the pan and close the oven door.

Reduce the heat to 400 F and set your timer to 55 minutes. It takes a a lot longer to n=bake a loaf of sourdough.

When done, remove from the oven and let it sit for 20 minutes, The bread will continue to bake in the middle of the loaf.

Enjoy!

To order one of my sourdough starter packages click here for more info.

Tuesday, February 17, 2015

Always Make a Backup!

I have been dealing with computers since before the first IBM PC was introduced and one thing I cannot stress enough is, ALWAYS KEEP A BACKUP! Someday that hard drive is going to quit working and today we have access to the Cloud via Google Drive, DropBox and others. But when it comes to Sourdough we have to rely on simpler methods to make a back up.

Let's face it, things happen. Right? 

What are some of those things? Bugs, heat, feeding and so much more can affect our starters which is why I always keep a small jar of starter in the fridge. It does not take much to reactivate a starter that's been stored in the fridge and my experience tells me a starter will last almost forever in the fridge.

Here is how you do it.  When you feed your starter and you normally dump it down the drain instead pour it into a small clean canning jar and tightly close it up. Use a canning jar with appropriate lid. Fluid will separate but don't worry about the fluid. 

To activate a starter from the fridge, scoop out a heaping tablespoon of cold starter and place it in a quart canning jar. Add 1 cup flour and (room temp) 3/4 cup spring water. Stir it up. Let it sit overnight and dump out half. Feed it another cup of flour and 3/4 cup water. Let it sit again. It does not hurt to feed it every twelve hours when reactivating your starter. Most starters will be very active in less than 36 hours.

Are you old enough to remember yeast cakes? A small package of yeast stored in a foil wrapping? When starter has been stored in the fridge for a while it has that consistency. Shows my age I guess.

All my starters (except two) use normal unbleached white flour. I do not use bread flour because I find my breads do better without the added wheat gluten. The exception to this rule is Chef Don's Megaheart Starter. He created his starter from grapes grown in the California foothills of Auburn, California and he used bread flour. I have tried to wean his starter off of bread flour to no avail. The other starter does is based on an Organic Dark Rye flour (Tara's). 

So remember! Keep a back up in the fridge, no matter what. I use these flat canning jars because I can stack them three to four high on the shelf in the fridge.

How To Order My Sourdough Starters

Sunday, December 21, 2014

My Sourdough Starters Make a Terrific Gift

My Order Page is HERE

I have sold a lot of sourdough starters over the last two years and have not yet had an unhappy customer. Admittedly, sourdough may not seem like it is for everyone. For example, if you live in a hot climate like a couple of my customers in Costa Rica, it is almost impossible to work with due to the heat. Other areas of the US it works best in winter, especially for those of you down south. This may be why over fifty percent of my sales are to folks in Canada.

Currently I have ten starters in all with one of them being a non-sour starter meant for basic bread baking. All of the starters are professionally packaged and come with two sets of instructions (On the back label of the packet and included with the recipes).

There are many different ways to use sourdough as the recipes on my blog and those included with the instructions can attest to. There are also many recipes available by simply doing a Google search. One of those recipes, HERE , was recently recommended by customer John Combs.


Try just one starter for only $4 ($4.70 for Canadians - postage costs more). You cannot go wrong. If you need help making up your mind try my very own Wasatch Willy's Sourdough Starter and then go from there. You will not be sorry or sad you did. I guarantee it. My Order Page is HERE

Anyway, I hope you have a Merry Christmas and a Happy New Year.

Bill Karoly
aka Wasatch Willy

Friday, November 14, 2014

Three New Starters and New Buying Options

Three New Starters!
I have added three new starters:

Sierra Gold - From California Wine Country
Quinn Hartley's Kern County Sourdough Starter
Chef Don's Megaheart Sourdough Starter


New Purchasing Options!
I have also added new purchasing options. You can now buy just one, any two, any four or all ten starters.

11-17-2014
There was a problem with the four pack ordering for Canadian customers not working but it is now fixed.

Order Here

Recent Loaves Using Quinn Hartley's

Wednesday, August 13, 2014

My Sourdough Method is Different - It's Not A Wet Process

My style of making sourdough is different than what some might think of when they envision a loaf of sourdough. I would love to make sourdough the wet method way but it requires space in the fridge and frankly that is something we just do not have right now so instead I do it the dense loaf method. For me it works.

If you want the large holes throughout your loaves then you will need to go that route. My starters will work just fine for either method because many of my customers are doing just that. 


Wasatch Willy's Sourdough - A Fresh Loaf

The only thing missing is the most wonderful sourdough smell. But for that you can order your own starter and try it for yourself. I suggest ordering my Wasatch Willy's Great Salt Lake Sourdough Starter and Best Darn Old Alaskan Sourdough Starter. It is only $5 for the two in the USA or $5.70 in Canada. When you order you get recipes and activation instructions. 

When making bread with my sourdough starters do not use bread flour. Use unbleached all purpose white flour only. You can also use wheat flour as well. Keep in mind wheat flour intensifies the sourness of the bread and you may want to shorten the fermentation period of the dough. White flour fermentation is normally about 12 hours between 65-70 degrees F.


Sunday, July 27, 2014

How to Order My Wasatch Willy Sourdough Starter

Orders are not live yet. I'm having PayPal order button issues. 

Cost is $10 for my Wasatch Willy Sourdough Starter with instructions and recipes. Please use the buttons below to order. Thank you.

In the meantime you can send $10 per order via PayPal to Bill Karoly / email is billkaroly AT gmailDOTcom

Be sure and email me with your address info.

Thanks

Wasatch Willy's
The Original Great Salt Lake Sourdough Starter

Simply the best sourdough starter I have
ever used. Made it myself from local wild yeasts.
Absolutely delicious. Just sour enough. Tastes very
similar to a good San Francisco Sourdough but it comes
from the Great Salt Lake region of Utah. It is a good and
lively natural Sourdough Yeast.


Monday, July 21, 2014

UPDATE: Wasatch Willy's Great Salt Lake Sourdough Starter

There is nothing quite like sourdough bread and I would like to introduce you to my latest sourdough starter, Wasatch Willy's Sourdough Starter. The flavor is somewhere between Valentina's and Alaska Sam's.

Update 7/22/2014 - When activating Wasatch Willy's Sourdough starter it smells exactly like Babo's San Francisco Starter. I have not tested Willy's under a microscope but the flavor is nearly identical. I can't call it a San Francisco Sourdough Starter because it's not from San Francisco such as Babo's or Valentina's. It was created from grapes grown in Syracuse, Utah which is on the shore of the Great Salt Lake.


Wasatch Willy's Sourdough Bread

1 Cup Wasatch Willy's Starter
3 Cups Room Temp Bottled Water
2 Teaspoons Salt
6-8 Cups Bread Flour

Mix the starter and water together for a minute, add the salt and then start adding the flour until the dough comes clean from the side of the mixing bowl. Let the mixer run for 5 minutes.


Place the dough into a large greased bowl and place in a cool spot for 12-24 hours. 


Lightly spray a baking sheet with oil and sprinkle with corn meal.


Form the dough into balls pulling from the sides and pinching at the bottom until the sides of the ball start to tear apart and place onto the baking sheet. Makes two medium or 4 small bowls. Let rise two hours.


Place your oven racks on the bottom two settings. Place a cast iron frying pan on the bottom rack. Pre-heat the oven to 450 F (230 C).  Boil 2 cups water and pour into the frying pan just before placing the bread in the oven. Place the bread in the oven and set your timer for 55 minutes. Lower the oven temperature to 400 F (205 C). Check the bread at the 45 minute mark. It should be just starting to turn brown. 


Remove the bread from the oven and place on a cooling rack and wait at least 15 minutes before serving. The bread is still cooking internally.


- - - - - - - - - - - - - - - - - - - - - - - - - - - - - - - - - - - - - - - - - - - - - - - - - - - - - - - - 

My Sourdough Starters
In early 2013 I started selling a San Francisco Sourdough Starter, Valentina's, which I obtained while in the US Army stationed at the Presidio of San Francisco in 1978. Since then I have extended my starters to an old family starter from San Francisco which I have named after my Grandmother whom I affectionately called, Babo. I also created a non-sourdough starter (Tara) for use in normal bread recipes and it works fantastically. I have two Alaskan Starters as well, Alaska Sam's and Best Damn Alaskan Sourdough Starter, both of which are good and sour. 


A friend gave me an old Mormon Pioneer Sourdough Starter which came across the plains in the 1800's which I call, Parley's. 


My favorite starter is named after me, Wasatch Willy. It's made from locally obtained wild yeasts and is a real crowd pleaser. Everyone who has tried it really likes it.


All orders include:
  • Two packets of dried starter. The one you order and one other at my discretion. Usually Alaska Sams or the other Alaskan starter. Limit one free starter per customer and does not include the Super 7 bundles.
  • Activation Instructions with recipes
  • Jar Label
New Packaging Front Label

New Packaging Reverse w/Instructions

Shipping Rates
All Prices include shipping. The US Post Office recently raised rates and so I have had to modify my prices slightly. I ship First Class mail. Orders are shipped in a #10 envelope. 

Where Do I ship to:

I will ship to anywhere in the United States or Canada. 

Questions: Call us at 801-784-8090 Monday - Friday 10am to 4pm Mountain Time.

To Order:
So as to simplify the updating process of my blog entries I have created a single ORDER page you can go to by clicking here. As the blog slowly grows in size (a few posts each month) it becomes an arduous labor updating each and every one of them so hopefully this will make the pages easier to peruse and more enjoyable. Thank you.

Tuesday, April 1, 2014

A Delicious and Simple White Bread Recipe

We cannot always eat sourdough bread, there are occasions when we need a break from sourdough and this recipe is a great choice.

The Masterful Ingredients

In a bowl combine and set aside:
3 and 1/3 Cups Warm Water
3 Tablespoons Yeast **
a little sugar

In the mixer bowl combine:
9 Cups Bread Flour
1 Tablespoon Salt
9 Tablespoons Sugar
3/4 Cup Powdered Milk
3/4 Cup Dry Instant Potatoes
3 Tablespoons Vital Wheat Gluten
3 Tablespoons Powdered Lecithin


In the microwave melt:
12 Tablespoons Unsalted Butter*

Slowly add the yeast mixture to the flour mixture and add the melted butter. Adjust the dough with either a little more water or flour to get the right consistency.

Run the mixer on medium speed with the dough hook for 15 minutes.

Prepare four bread pans. Pre-heat the oven to 350 degrees F.

When the dough is ready, divide into four loaves and place on top of the stove and cover with a damp cloth. Place the bread in the oven when the side of the loaves are equal to the sides of the pans. Bake for 25-35 minutes.

Wait 20 to 30 minutes to cool down before slicing. Enjoy!


* You may chose to use salted butter.
** Instead of yeast you might try substituting Tara Natural Yeast but keep in mind that rise times will be 4-6 hours. Click on the Sourdough Bread link above.

Wednesday, February 26, 2014

Activating Wasatch Willy Sourdough Starter - Easy and Simple

(Scroll to the bottom to order your own Wasatch Willy Sourdough Starter.)

Sourdough Starter is not like your fast acting yeast you purchase at a grocery store which is why I like it so much. It's an all natural product from nature which has been untouched by science. 

The other day I made two batches of bread. One was sourdough using Wasatch Willy and the other was wheat bread made from fast acting yeast. Time from mixing the dough to the oven:

Sourdough Bread - about 15 hours
Fast Acting Yeast Bread - about 4 hours

I send out my starters in small sealed packets which contain a teaspoon of dried sourdough starter. The natural yeasties in the starter shut down and protect themselves as they are exposed to the air and they begin to dry out. When they are re-introduced to water and flour they begin to slowly spring back to life.

It is not unusual for dried sourdough starter to take 3 or more days to fully re-activate.

A customer in Canada recently contacted me because his Wasatch Willy was not activating. It was bubbly and had the smell but was not rising. He used filtered water instead of bottled as I suggest in my instructions. 

Below are pictures of my recent activation from dried granules. Today is Day Three.

Step One:

Place 1/2 cup "Bottled" water that is at room temperature into a quart jar. I used a 40 ounce peanut butter jar. 

Pour the starter granules into the water, stir a little and let them sit for 15 minutes.

Pour 1/2 cup unbleached white flour into the jar and stir again. Cover loosely and let sit for 12 hours. Leave it on your countertop.

Step Two

After 12 hours stir and pour out half the starter and discard. Now add 1/2 cup flour and 1/2 cup water and stir. Cover and let sit for another 12 hours.

Step Three

By this time your starter has been percolating slowly for 24 hours. Remove the lid and take a wiff. Ah! So good! Give it a stir. Does the starter feel stringy? It should be stringy at this stage.

Again, add 1/2 cup flour and 1/2 cup bottled water, stir and let sit twelve more hours. Are you bored yet? It is slow and tedious but the rewards are wonderful.

Repeat Step Three until the starter doubles in size.

Now that my Wasatch Willy is growing I can switch to filtered water or tap water. If you do decide to use filtered or tap water split your starter in two. One for bottled water and the other for the water you choose to go with. That way if your "other" water kills your starter all is not lost.


Wasatch Willy Day One Zero Hour
Wasatch Willy Day Two - Third Feeding
Wasatch Willy Sourdough Starter Day Three - after 5th Feeding.
If you have ANY questions you can e*m*a*i*l me at b*i*l*l*k*a*r*o*l*y@gmail.com. Remove the * from the email address.


- - - - - - - - - - - - - - - - - - - - - - - - - - - - - - - - - - - - - - - - - - - - - - - - - - - - - - - - 


To simplify the updating process of my blog entries I have created a single ORDER page you can go to by clicking here. As the blog slowly grows in size (a few posts each month) it becomes an arduous labor updating each and every one of them so hopefully this will make the pages easier to peruse and more enjoyable. Thank you.

Tuesday, February 18, 2014

Making A Better Bread Lame


This is a design which has been stuck in my head for some time now. It is made from two paint sticks. These are from the older, nicer, paint sticks which you cannot get any longer. The larger paint sticks for the large buckets of paint are still decent and will work but they are thicker overall. Walmart sells them here for .28 each and one is enough. Just cut it in half.

You Will Need:
2 paint sticks
3/16" drill bit and a Drill
2 washers
3/16 x 3/4" machine screw
3/16" Wing Nut
Wood Glue
Two clamps
scraps of wood
Miter Saw
Safety Razor Blade

One side of each stick has printing on it so you want to face the printed sides inward. Make a mark about six and a half inches from the end of the stick. From about 3" to 7" apply a very very thin coat of wood glue and clamp the sides together. Be sure and use the scrap wood to protect your Lame from marks caused by the clamps. Wipe away excess glue. Make sure your sticks are straight and even. Allow the glue to set and dry. Usually about 24 hours.


When the glue is dry, remove the clamps. Using the miter saw, cut your lame down to 6 or 6.5 inches.


On the non-glued section of the Lame decide where you will drill the hole for the machine screw. For me it was 13/16's inch from the end and and 1/2" from the edge. I put a scrap piece of wood under the Lame to minimize damage caused by the drill bit. 


Sand the Lame and finish it as desired. For mine I used a clear acrylic spray.


Sourdough or French Bread Lame Construction, glued at one end.
Bread Lame Glued


Sourdough or French Bread Lame Blade Installed
Bread Lame with Blade Installed

Sourdough or French Bread Lame Blade ready to slice the dough,
Bread Lame with Blade Ready to Slice

Sourdough or French Bread Lame Blade ready to slice the dough.
Bread Lame with Blade Ready to Slice

Sourdough or French Bread Lame Blade Stowed for safety.
Bread Lame with Blade Stowed for Safety


Sourdough or French Bread Lame Blade Stowed for safety.
Bread Lame Finished and Blade Stowed
Sourdough or French Bread Lame Blade Scored Dough

Sourdough or French Bread Lame Blade Scored Baked Bread
Samsung Galaxy Note 3 Free Wallpaper
FREE 1920 x 1280 Wallpaper for Cell Phone
- - - - - - - - - - - - - - - - - - - - - - - - - - - - - - - - - - - - - - - - - - - - - - - - - - - - - - - - 

To simplify the updating process of my blog entries I have created a single ORDER page you can go to by clicking here. As the blog slowly grows in size (a few posts each month) it becomes an arduous labor updating each and every one of them so hopefully this will make the pages easier to peruse and more enjoyable. Thank you.

Wednesday, February 12, 2014

A DIY Easy to Make Baking Stone - Part Two

aka DIY Pizza Stone

UPDATE 4/5/2014
One of the pieces or Travertine has cracked! But I have others. I have thought about heating the stones in stages. Not sure if this will help or not. The cracking is caused by my boiling water which I pour into a cast iron pan which sits directly below the stones.

I have this big bump on the back of my head from a slip on the ice in my works dimly lit parking lot on Monday night and it kept me up all night. I ended up with about two hours of sleep so if I am rambling and making no sense, please forgive me.

In Part One we discussed the options of Baking Stones such as ceramic tile, actual baking stones, and Travertine. I showed a picture of the stones I purchased at my local Big Box Store. I spent about $17 for two 18x18 Tuscany Travertine square tiles and they were snug from front to back on the rack. I almost thought I would not be able to close the oven door but it was no problem.

Since I was restless (my head hurting like a son of a gun) I thought about the dimensions of the oven rack and at 3AM I got up and measured. I determined the ultimate size would be 11" x 14" for my oven and after only a few hours sleep, I went to my BBS (BIG BOX STORE) with the tiles from yesterday and bought two more. I then had a fine gentleman cut them down for my on their tile saw. The cuts were free, by the way.


Free Cuts at Lowes - Travertine as Baking Stone
I had intended to double up the stones but they just weigh too much. 24 pounds of tile is just too much for our ovens rack to handle. So now I have an extra set and a side effect of cutting the tiles I now have 3 pcs of 7x14 inch Travertine as well so I effectively have three sets of baking stones.

Tomorrow night we are having 15 Bean Soup with bacon and Turkey Sausage served in bread bowls. Tonight I made six. The first three were baked on sheets on the Travertine and the second set of three were baked directly on the stones.


Sourdough Soup Bowls baking at 425 F

Sourdough Soup Bowls Cooling
 - - - - - - - - - - - - - - - - - - - - - - - - - - - - 


To simplify the updating process of my blog entries I have created a single ORDER page you can go to by clicking here. As the blog slowly grows in size (a few posts each month) it becomes an arduous labor updating each and every one of them so hopefully this will make the pages easier to peruse and more enjoyable. Thank you.


A DIY Easy to Make Baking Stone - Part One

or: The Search for the Alternative to High Priced Baking Stones

I have searched and searched for a Baking Stone (Pizza Stone) for use when making my sourdough breads and the costs were just unreal in my opinion. Comments on Amazon were filled with story after story of how the Baking Stones either arrived broken or they broke in the oven on the first use. So I went looking for a solution.

Kiln Shelves
Kiln Shelves are half round stones and cost about $60 each, uncut. You then have to cut them to shape. Not a perfect solution. If you look locally at a Ceramics Supply store you can find these but there has to be a better way.

Ceramic Tiles
I have tried these in my oven previously and they have to be unglazed but they crack eventually.

Travertine Tiles
The other day I loaded up You Tube on my Galaxy Note 3 and there was a video by Noreen of Noreen's Kitchen espousing the virtues of Travertine. This really caught my attention and I did a little more research and watched another video from someone else and decided to go for it. 

Our local Lowes sells A&R Tuscan Travertine 18 inch square tiles that are just under half an inch thick and they sell for $7.76 each here in Northern Utah. Prices may vary elsewhere. I bought two. After taxes it was about $8.26 each. Stacked together they are about 7/8" thick and they are kind of too big for the depth of our even. I am going to go back and get another one and bring the two I bought with me to have them cut down a little so they fit the oven. The optimal size for my oven is 22 x 14 inches. I figure on making them 11 x 14 inches. 

Here is a photo of the uncut stones on the bottom rack of the oven.


In Part Two I discuss baking bread directly on the Travertine using my Wasatch Willy Artisan Sourdough Bread made with my Wasatch Willy Organic Sourdough All Natural Yeast (aka Sourdough Starter).

 - - - - 


So as to simplify the updating process of my blog entries I have created a single ORDER page you can go to by clicking here. As the blog slowly grows in size (a few posts each month) it becomes an arduous labor updating each and every one of them so hopefully this will make the pages easier to peruse and more enjoyable. Thank you.


Wednesday, January 8, 2014

Less Flour Equals a Wetter Dough Equals Better Results

Lately I have been experimenting with making the dough by hand and I have been very please with the results. Here is the recipe:

1 batch starter (Wasatch Willy in this case) (about a cup)
3 Cups water
1 Tablespoon Salt
6 Cups Flour

I use an IKEA cup that holds just over a cup when filled to the lip. 

In a large bowl combine the starter, water and salt. Stir. Feed the starter and continue.


Now add the flour a cup at a time. The flour will be very lumpy and sticky. Be sure and wipe the sides and bottom of the bowl to get all of the flour mixed into the dough.

Cover the bowl and let it sit for 12-16 hours in a cool location. My basement has been around 60-65 degrees F and is perfect for this.

Turn on the oven light and get the oven warmed up to  around 80-90 F.

On a large clean work surface spray water and then dump the dough onto the surface. Keeping your hands wet form the loaf.

Take a baking sheet and lightly spray with oil and sprinkle corn flour or dry creamy wheat cereal. Place the loaf on the baking sheet.


Place the racks in the oven on the bottom two shelves. Place a cast-iron skillet on the bottom rack. Pre-heat the oven to 475 F.


Boil two cups of water and pour into the skillet when the oven is at temperature. Place the baking sheet with the loaf in the oven and set the timer to 45-60 minutes and lower the temperature to 400 F. If the loaf is not too dark go ahead and bake it for the full 60 minutes. 


You can also apply a wash to the dough at the 45 minute mark and bake for another 10 minutes. Prepare the wash before you bake the bread. For the wash boil two cups of water and a heaping tablespoon of cornstarch until it starts to thicken. Then set it aside and cool.

You should get a nice oven bounce. Place the finished loaf on a cooling rack and let it sit for 15 minutes before serving.


To simplify the updating process of my blog entries I have created a single ORDER page you can go to by clicking here. As the blog slowly grows in size (a few posts each month) it becomes an arduous labor updating each and every one of them so hopefully this will make the pages easier to peruse and more enjoyable. Thank you.