Showing posts with label baking stone. Show all posts

Wednesday, February 8, 2017

Just Make A Batch of Sourdough Bread!

I am calling this post, Just Make a Batch of Sourdough Bread, because sometimes you need a little encouragement. We all need it sometimes.

I have been running low on some granules of Valentina's and Babo's San Francisco Sourdough Starter. My last post was of a batch of bread using Valentina's because I reactivated her and once ready spread the starter on a large plastic tray to dry and since Valentina's was now active I also made a couple of batches of bread and made pancakes too a few times.

Next I activated a batch of Babo's. In fact, right now I have four loaves baking in the oven and it smells oh so good. 

Valentina's and Babo's both come from San Francisco but they are different. Babo's needs a little more care after making the dough. I let the dough rest for twelve to fourteen hours in a cool environment of about 60-65 degrees F before dividing into loaves. I then let the loaves sit at 80 to 85F for a couple more hours before placing in the oven.

I use the same basic recipe for all of my sourdough starters:

1 Batch of Starter doubled in size 
3 Cups room temp water
1 to 2 Tablespoons Salt*
8 or 9 Cups Unbleached Flour

I combine all the ingredients in my Bosch mixer and let the machine run for ten minutes after the last of the flour is added. Pour 90 percent of the starter into the mixing bowl. You only need a little starter left in the jar when feeding it. I am not of the school that says to only use half. In my opinion that is ridiculous and can lead to weak starters. By using all but some scraps in the jar you are promoting healthy vibrant sourdough starters.

Then I remove the dough and place in a large plastic Tupperware bowl that has been sprayed with cooking oil. Then I place the lid on top but not sealing it and let the dough rise overnight. The next day I divide the dough into 4 or 5 round loaves and place on a tray that has been lightly oiled and sprinkled with a little corn flour. 

In my oven I have a Travertine tile from Lowes that I pre-heat to 450F. I also have a small cast iron frying pan that I pour in 2 cups of boiling water. Wear large oven mitts for this because you may burn yourself at this stage. Always be careful. 

I either transfer the loaves to the travertine directly or I just lay the tray I am using on top of the stone, add the boiling water and then close the door and reduce the temperature to 400.

Making your own homemade sourdough bread is very rewarding. If you would like to order one or all of my starters you can click here.

* Use of Salt for those on a salt restricted diet. Check out Chef Don's Megaheart.com site for his sourdough recipes.

Pictures of today's batch of bread are coming.


Babo's SF Starter
35 Minutes in the Oven so far


Friday, August 1, 2014

Making Sourdough Bread Is Not Rocket Science

I started this blog in early 2012 and I regularly post articles praising the ease of baking with sourdough. I am constantly giving loaves of bread to my friends and almost always they remark, “Oh wow! That takes a long time to make, right?” and I invariably reply, “No, not really.” So what I am saying is do not be intimidated. The actual time you spend making sourdough itself is not that much because the majority of the time is spent by the fermentation process.

Sourdough can be intimidating until you get to know it. It’s a mind game really. There’s the feeding of the Starter, the initial making of the dough, the fermentation process that can take twelve or more hours and then the rise time. 

If you have a recipe that calls for yeast you should run away from it as fast as you can. Sourdough, if the starter is a good one, does not need added yeast. The flavor of the sourdough comes from the fermentation process and adding yeast robs it of that process, hence robbing it of the flavor as well.

Sourdough bread is really a simple recipe. Essentially it consists of the starter, quality water, salt and flour. That’s it.   I bake my bread in round loaves because they are the easiest for me to form and they fit in the oven better and I bake them on travertine tiles cut to fit on my oven rack. Not having a pizza peel I use a large steel spatula and place my loaves on aluminum foil coated in cooking spray and dusted with corn meal.

Here is my recipe. I usually make it in my Bosch mixer rather than by hand these days but when I was younger I would not shy from from doing it by hand.

Sourdough Bread Ingredients:
  • 1 Cup Wasatch Willys Sourdough Starter Fed and bubbly
  • 3 Cups Spring Water room temperature
  • 1 tablespoon salt
  • 8-9 Cups Unbleached All-Purpose Flour
In your mixer bowl combine the active and bubbly starter, bottled spring water and salt. Mix until blended using the dough hook. Add the flour until the dough no longer clings to the sides of the bowl and springs back to the touch. Run the mixer for another ten minutes. 

Remove the dough from the mixer bowl and place it in a lightly greased bowl and cover it. Place it in a cool spot for at least twelve hours. I use my basement. In the summertime my basement is about 70 degrees and twelve hours seems to work perfectly but in the winter it’s closer to 60 and sixteen to eighteen hours is the average fermentation time.

Once the dough has fully risen to the top of the bowl and the fermentation time is up, remove it from the bowl and divide it into loaves. I use a digital scale to measure the dough into four equal parts. 

Form the dough into a ball and flatten it on your prepared surface. Then start grabbing the edges and pull it to the center forming a ball until the skin is nice and tight. Be careful not to pull too much or the skin of the dough will start to rip. Place the ball gathered side down onto a baking sheet sprinkled with corn meal. Allow enough space for the loaves to raise but not touch each other. 

Score them with a sharp knife or lame in a cross pattern and cover with a damp cloth on top of the stove.

Now place your oven racks on the bottom two slots. If you have a small cast iron frying pan place this on the bottom rack. Set your oven to 475. If you have travertine tiles in the oven I suggest rather than using a baking sheet, cut aluminum foil into squares and use that instead. That way you can place the loaves directly onto the tiles and your bread will bake more evenly with a nice browning on the bottom.

If your kitchen is warm, it should only take an hour and a half for the bread to raise enough to pop in the oven. Before you do, however, boil two cups of water first. 

Place the loaves in the oven. Wearing an oven mitt, pour the boiling water into the pan on the bottom rack and slide it to the middle of the oven with a spatula. Close the oven door.

Reduce the oven temperature to 400F. Bake about 60 minutes. I have found my bread comes out perfectly with a nice thick reddish crust. I do not bother with either an egg or corn starch wash because I like my crust natural and crunchy.

Place the loaves on a cooling rack and allow at least twenty minutes to cool before slicing into them. 

Of the starters I sell on my blog, my favorites are my Wasatch Willy’s and the Best Darn Old Alaskan. Both are unique and I really enjoy the flavor they provide. 

Variation: One of the variations I like to do is add Kale to the Best Darn Old Alaskan. I go out to the garden and grab a handful and put it in the blender with the starter and some of the water until liquefied and then proceed with my standard bread recipe. The starter feeds off the Kale and gives it a Turbo Boost making it very flavorful with a green tinge.

My Starter

Baking on Travertine

A Lovely Loaf

Look At That Slice!


The Kale Option

Kale Blended

Kale Added

Kale Sourdough Bread Dough


For more info on my Sourdough Starters
click the More Info Here button above or click here.

Wednesday, February 12, 2014

A DIY Easy to Make Baking Stone - Part Two

aka DIY Pizza Stone

UPDATE 4/5/2014
One of the pieces or Travertine has cracked! But I have others. I have thought about heating the stones in stages. Not sure if this will help or not. The cracking is caused by my boiling water which I pour into a cast iron pan which sits directly below the stones.

I have this big bump on the back of my head from a slip on the ice in my works dimly lit parking lot on Monday night and it kept me up all night. I ended up with about two hours of sleep so if I am rambling and making no sense, please forgive me.

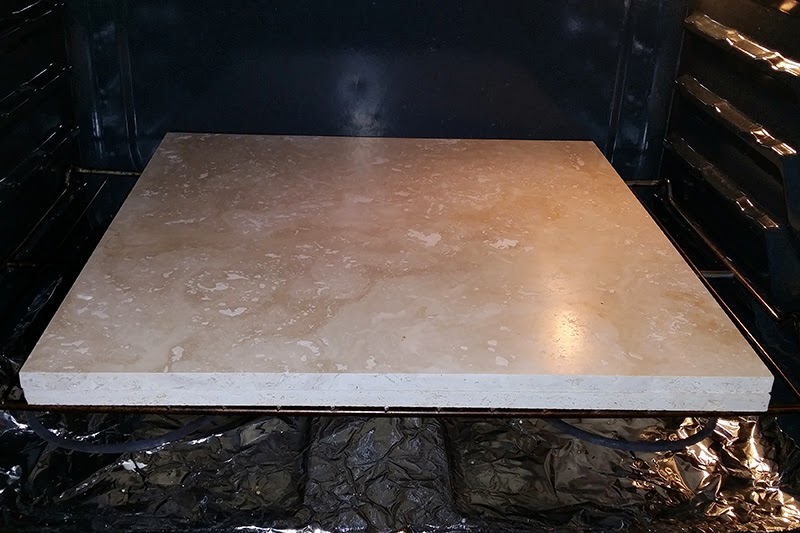
In Part One we discussed the options of Baking Stones such as ceramic tile, actual baking stones, and Travertine. I showed a picture of the stones I purchased at my local Big Box Store. I spent about $17 for two 18x18 Tuscany Travertine square tiles and they were snug from front to back on the rack. I almost thought I would not be able to close the oven door but it was no problem.

Since I was restless (my head hurting like a son of a gun) I thought about the dimensions of the oven rack and at 3AM I got up and measured. I determined the ultimate size would be 11" x 14" for my oven and after only a few hours sleep, I went to my BBS (BIG BOX STORE) with the tiles from yesterday and bought two more. I then had a fine gentleman cut them down for my on their tile saw. The cuts were free, by the way.


Free Cuts at Lowes - Travertine as Baking Stone
I had intended to double up the stones but they just weigh too much. 24 pounds of tile is just too much for our ovens rack to handle. So now I have an extra set and a side effect of cutting the tiles I now have 3 pcs of 7x14 inch Travertine as well so I effectively have three sets of baking stones.

Tomorrow night we are having 15 Bean Soup with bacon and Turkey Sausage served in bread bowls. Tonight I made six. The first three were baked on sheets on the Travertine and the second set of three were baked directly on the stones.


Sourdough Soup Bowls baking at 425 F

Sourdough Soup Bowls Cooling
 - - - - - - - - - - - - - - - - - - - - - - - - - - - - 


To simplify the updating process of my blog entries I have created a single ORDER page you can go to by clicking here. As the blog slowly grows in size (a few posts each month) it becomes an arduous labor updating each and every one of them so hopefully this will make the pages easier to peruse and more enjoyable. Thank you.


A DIY Easy to Make Baking Stone - Part One

or: The Search for the Alternative to High Priced Baking Stones

I have searched and searched for a Baking Stone (Pizza Stone) for use when making my sourdough breads and the costs were just unreal in my opinion. Comments on Amazon were filled with story after story of how the Baking Stones either arrived broken or they broke in the oven on the first use. So I went looking for a solution.

Kiln Shelves
Kiln Shelves are half round stones and cost about $60 each, uncut. You then have to cut them to shape. Not a perfect solution. If you look locally at a Ceramics Supply store you can find these but there has to be a better way.

Ceramic Tiles
I have tried these in my oven previously and they have to be unglazed but they crack eventually.

Travertine Tiles
The other day I loaded up You Tube on my Galaxy Note 3 and there was a video by Noreen of Noreen's Kitchen espousing the virtues of Travertine. This really caught my attention and I did a little more research and watched another video from someone else and decided to go for it. 

Our local Lowes sells A&R Tuscan Travertine 18 inch square tiles that are just under half an inch thick and they sell for $7.76 each here in Northern Utah. Prices may vary elsewhere. I bought two. After taxes it was about $8.26 each. Stacked together they are about 7/8" thick and they are kind of too big for the depth of our even. I am going to go back and get another one and bring the two I bought with me to have them cut down a little so they fit the oven. The optimal size for my oven is 22 x 14 inches. I figure on making them 11 x 14 inches. 

Here is a photo of the uncut stones on the bottom rack of the oven.


In Part Two I discuss baking bread directly on the Travertine using my Wasatch Willy Artisan Sourdough Bread made with my Wasatch Willy Organic Sourdough All Natural Yeast (aka Sourdough Starter).

 - - - - 


So as to simplify the updating process of my blog entries I have created a single ORDER page you can go to by clicking here. As the blog slowly grows in size (a few posts each month) it becomes an arduous labor updating each and every one of them so hopefully this will make the pages easier to peruse and more enjoyable. Thank you.